Remote View Raspberry Pi Camera Stream with Docker
Learn how to containerize the Raspberry Pi Camera Module using MediaMTX and Docker for low-latency remote debugging and visual feedback directly in VS Code.

This post is part of the Tools as a Service Series. Full architecture overview here.
Why You Need Remote Eyes
In the last post, we added remote serial access to our TaaS core, letting us send and receive data from afar. But embedded development isn't just about serial logs and debug outputs, it's also about seeing what's happening. Whether it's LEDs blinking, screens updating, or physical interactions, sometimes you just need to look at your device. Trekking to the devbox every time you want to check a visual cue? Yeah, that's not happening.
The solution? A webcam pointed right at your hardware. The Raspberry Pi makes this easy, supporting both USB cameras and the official Pi Camera Module. Today, we'll dive into setting up the Raspberry Pi Camera Module and containerizing the whole thing with a Docker container, so you can keep an eye on your device from anywhere. So, let's get started with the remote viewing setup!
Understanding the Raspberry Pi Camera Module
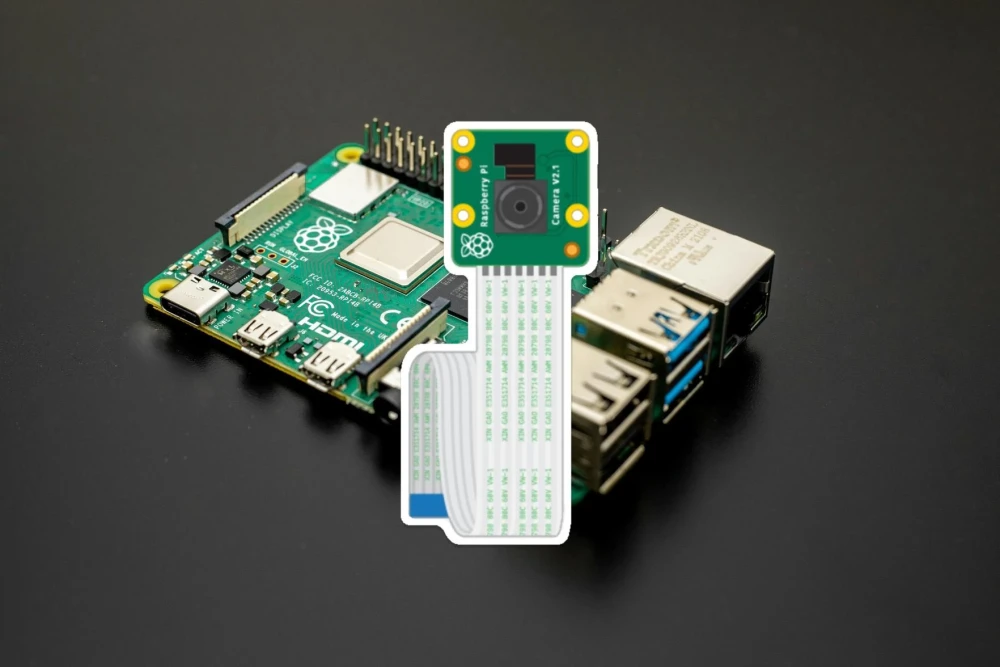
The Raspberry Pi Camera Module 2, released in 2016, is a nifty little sensor that plugs directly into the CSI (Camera Serial Interface) port via a ribbon cable. It's a step up from the original 5MP module, offering better performance and tighter integration with the Pi's hardware.

Out of the box, Raspberry Pi OS (using Trixie based image) comes with built-in camera libraries, but here’s what you really need to know:
- rpicam-apps: The modern, go-to toolkit for Raspberry Pi OS (Bullseye and later). Built on the libcamera framework, it handles all the heavy lifting—like sensor handshakes and image processing—so you don't have to. Commands like
rpicam-vidandrpicam-stillmake capturing video and stills a breeze. - V4L2 (Video4Linux2): The universal Linux framework for video devices. Most software expects a V4L2 device, and libcamera helpfully provides a compatibility layer so older tools can still play nice.
Testing the Camera Module on the Pi OS
Before we jump into creating a Docker container, let's first make sure the camera is talking to the Pi. Start by inserting the ribbon cable into the by and make sure it is snug in the camera module port. The blue line of the ribbon cable goes towards the black plastic clip.

Next, run this command to see if the kernel recognizes the hardware:
$ v4l2-ctl --list-devices
bcm2835-codec-decode (platform:bcm2835-codec):
        /dev/video10
        /dev/video11
        /dev/video12
        /dev/video18
        /dev/video31

bcm2835-isp (platform:bcm2835-isp):
        /dev/video13
        /dev/video14
        /dev/video15
        /dev/video16
        /dev/video20
        /dev/video21
        /dev/video22
        /dev/video23
        /dev/media2
        /dev/media3

unicam (platform:fe801000.csi):
        /dev/video0
        /dev/media1

rpi-hevc-dec (platform:rpi-hevc-dec):
        /dev/video19
        /dev/media0

bcm2835-codec (vchiq:bcm28
Look for an entry labeled "unicam". If it's missing, check the cable or ensure camera_auto_detect=1 is in your /boot/config.txt.
Verify the hardware with the rpicam-hello command:
rpicam-hello --timeout 5000We can also generate a still image:
rpicam-still --immediate -o test.jpgRunning the Raspberry Pi Camera Module in Docker
I wanted a setup that worked seamlessly with both USB and CSI cameras, on ARM and AMD machines. After a few (okay, many) attempts at building a custom image and wrestling with libcamera inside a container, I stumbled upon bluenviron/mediamtx. It's a lightweight, flexible media server that supports CSI and USB cameras and allows to publish, read, proxy, record and playback video and audio streams.
This seemed like a excellent choice for what I was attempting to achieve. They, according to their documentation pages, provide 4 different images, some with RPI Camera and some with FFmpeg support. This means, depending on the host we are on and the type of camera we want to access we can change the Docker image accordingly.
Running the Container
As we are using the Raspberry Pi 4, we want to use the bluenviron/mediamtx:1-rpi image. Lets spin it up like this:
$ docker run --rm --name="camera" --network=host --privileged \
    --tmpfs /dev/shm:exec \
    -v ./mediamtx.yml:/mediamtx.yml \
    -v /run/udev:/run/udev:ro \
    bluenviron/mediamtx:1-rpi
There is a lot going on, so lets go over some of the commands (the uncommon commands):
--network=hostthis will use our host network adapter to open several ports. We could define each port and mapping ourself, but this is the easier method at the moment.--privilegedflag gives all capabilities to the container, this is needed as we need hardware access. There are probably ways to give only the privileges the container needs, as we did by just passing the debug probe device to openocd container.--tmpfs /dev/shm:execthis seems to be required as the camera drivers use shared memory to pass high-resolution frames between the hardware and the software.-v /run/udev:/run/udev:rothis allows the container to see hardware "events". The container seemed to work fine without it, but it was suggested in one of the GitHub comments.
Configuring the Stream
Create a mediamtx.yml file to define your stream. There are ton of different configuration parameters, but we will be taking the bare minimum RPI Camera configuration from device configuration documentation pages:
paths:
  # primary stream
  rpi:
    source: rpiCamera
    # Width of frames.
    rpiCameraWidth: 1920
    # Height of frames.
    rpiCameraHeight: 1080
    # FPS.
    rpiCameraFPS: 30
Point your browser to http://IP-OF-PI4:8889/rpi, and our camera feed is live!
The port 8889 is the Web Real-Time Communication port, which has a very low latency and works best for this kind of remote development setup.
Viewing Camera Stream inside VS Code
Here is a cool tip! With VS Code’s "Simple Browser" feature you can pull up the stream right in your editor. So you can have all the remote development tools right in the IDE.

What’s Next?
In the next post, we’ll explore adding more tools to our TaaS toolkit. Stay tuned for more ways to streamline your embedded development workflow!
All Posts in This Series
- Part 1: Getting Started with OpenOCD: A Beginner's Guide
- Part 2: Remote Debugging with Raspberry Pi and OpenOCD
- Part 3: Cross-Compiling OpenOCD: A Step-by-Step Walkthrough
- Part 4: Simplifying OpenOCD Deployment with a Debian Package
- Part 5: Automating OpenOCD Distribution with a Private Gitea Package Registry
- Part 6: Running OpenOCD in Docker: A "Tools as Service" Approach to Embedded DevOps
- Part 7: Creating a Containerized Remote Serial Interface with Docker and Socat
- Part 8: Remote View Raspberry Pi Camera Stream with Docker (Current Post)
How to Use RTT in Embedded Rust: Setup and Logging
Learn how to use RTT in Embedded Rust for fast, non-blocking debug logging. This guide covers setup, rtt-target usage, OpenOCD configuration, and VS Code auto-start.
Cross-Compiling OpenOCD: A Step-by-Step Walkthrough
Learn how to build OpenOCD binaries on Ubuntu 22.04 for both the ARM64 and AMD64 target architectures. A great way to share a consistent OpenOCD build across your Debian systems

DNS Sinkhole: How to Block Malicious Sites and Trackers at the Network Level
Deploy Pi-hole on a Raspberry Pi to block malicious domains and trackers network-wide. Learn how to configure blocklists and prevent DNS bypasses in this hands-on guide.
Whether you're building something new, fixing stability issues, or automating what slows your team down — we can help.